Configuration#
Configuring the add-on#
After enabling the addon, you should be able to access its settings. umodel_tools supports
multiple game profiles. A game profile is a set of game-specific settings such as UE Viewer export directory and
asset library. Game profiles are required for the correct import of material node trees with respect to the
game-specific Unreal Engine materials.
In order to add a game profile, you can use the + and - buttons in the profile list. You can name your profile
with an arbitrary name by double clicking it in the list. The currently selected profile determines the currently active
profile.
Inside of the profile settings you need to specify the
Gameparameter with the Unreal Engine game you want to import the assets or maps from. If the game is not available in the dropdown menu, you can try theGenericentry which can attempt to approximate material generation for any game. In case the result of theGenericalgorithm happens to be unfavorable, you can implement the game handler yourself or request a game to be supported by creating an issue. See the list of supported games.UModel Export Directoryshould be set to an existing folder where you will export the game assets to usingUModel.Asset directoryshould be set to an existing directory where Blender will keep a library of assets for this game profile. It has to be an existing directory.
Configuring UModel (UEViewer) and extracting assets#
When you launch UModel, you will be greated with the UE Viewer Startup Options window.
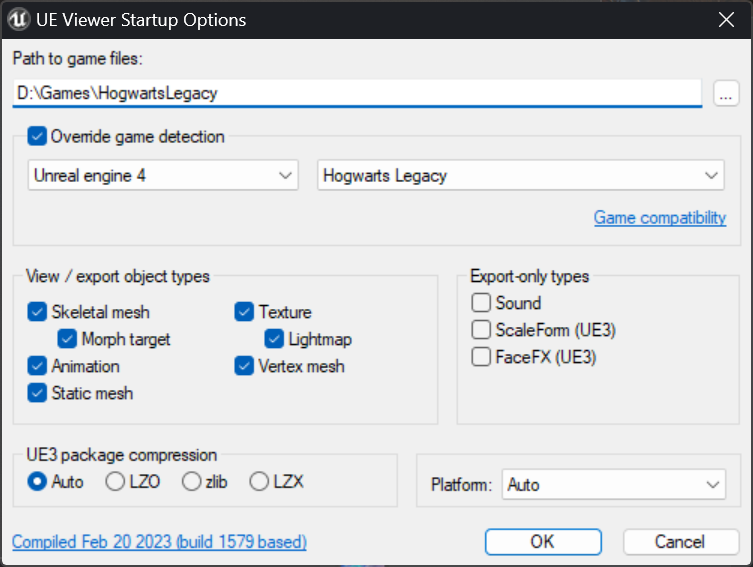
Point the
Path to game files:option to the location of your game.Enable the
Override game detectioncheckbox.Select the version of Unreal Engine and the specific game (if available) in two dropdown menus below.
Note
If a specific game is not available in the menu, you need to select the exact version of Unreal Engine this game was built with. This can be usually found fairly easily in the search engines. If the version is incorrect, you are likely to face crashes of UModel on attempt to view or export assets.
The rest of the settings may remain unchanged. Hit
Okayto load the game inUE Viewer.
Once the game is loaded, you should be able to see the Choose a package to open window with a tree view of the
game’s files. We need to configure a few more things before exporting textures and models.
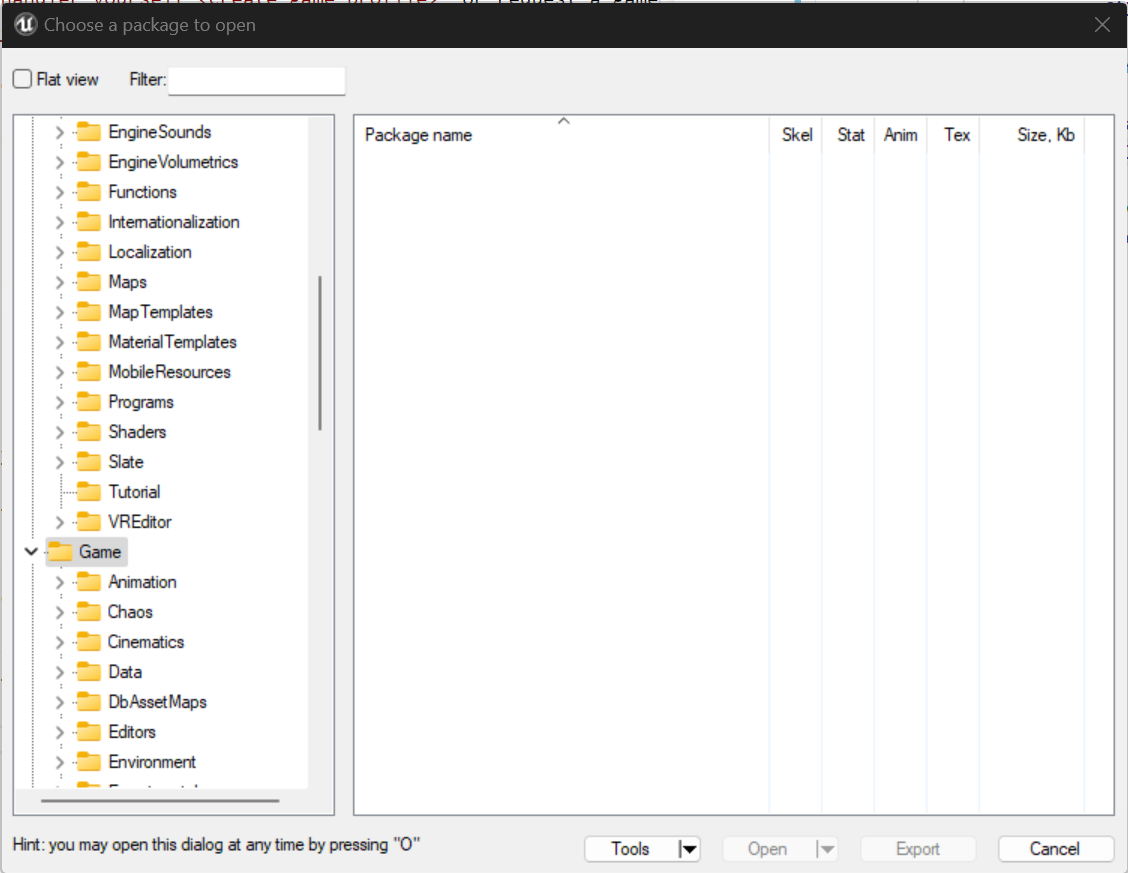
Click on the
Toolsbutton in the bottom of the window.Select
Optionsin the dropdown.
The Options window should appear.
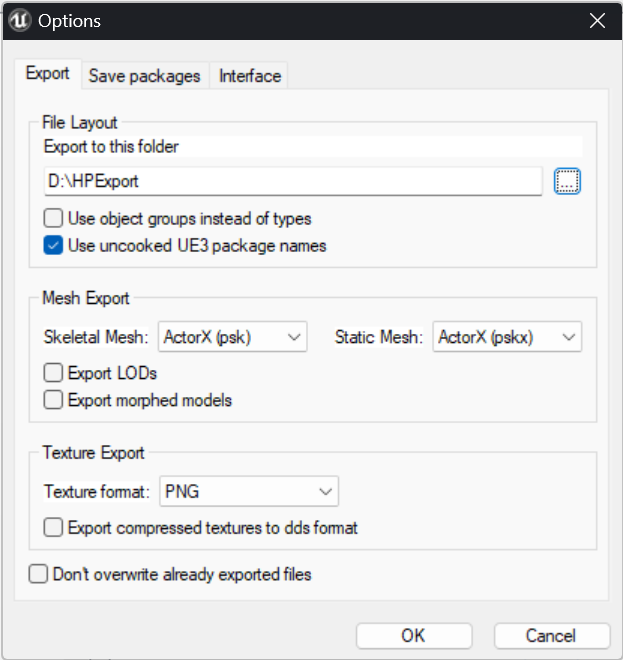
Enter the path to your export directory into the
Export to this folderfield. It should be the same directory as the one we specified in the add-on’s game profile settings asUModel Export Directory.Make sure that both
Skeletal MeshandStatic Meshunder theMesh Exportsection are set to ActorX. Theumodel_toolsBlender add-on supports only the .psk/.pskx files as mesh assets.Make sure that
Texture formatunderTexture Exportsection is set toPNG. Other extensions are also supported by the add-on, but .png is more reliable, and can be easily opened by various graphics software.Leave all other settings unchanged (as shown on the picture), and git
OKto save the settings.
As the configuration is over, it is recommended to export the entire game into the export folder. In order to do
that, right click on the root folder in the tree view and choose Export folder content. This will bring up the
already familiar Export options window. It should be already configured properly, so just hit the OK button to
perform the export.
Note
The export procedure may take a significant amount of time, be patient, it is a one-time task.
It is normally possible to export only the Game directory, ignoring the Engine directory which can save
some space, but this may vary from game to game and is not guaranteed to work in all the cases. However, if you want
shorter import times or less disk space usage, you can also experiment with various UEViewer startup options.
Configuring FModel and extracting maps#
Launch
FModel.In the top menu of
FModelselect Settings. A Settings window should appear.
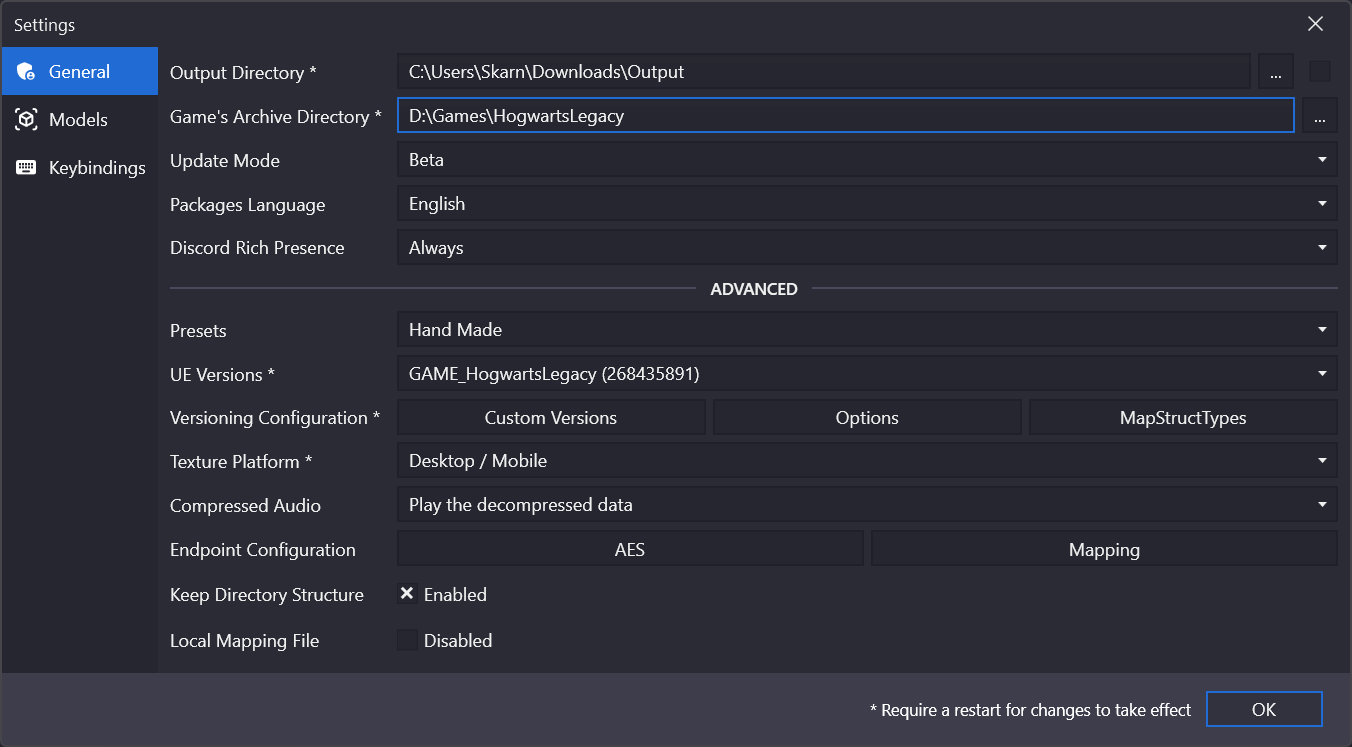
Set
Output Directoryto any directory on your PC you wantFModelto export to.Set
Game's Archive Directoryto the directory of your game.Set
UE Versionsto the correct game profile or Unreal Engine version (if specific game is not available).Hit
Okay, which should save the settings and restart the application.
You can now launch FModel again and export a map with it. In order to to do this, find the required map, right click
on its name in the tree view and select Save Properties (.json). This will produce a .json output file in the
Output Directory. Alternatively, you can export the entire directory by right clicking it and choosing
Export Folder's Packages Properties (.json) (also applied to child directories).
Warning
Some games’ maps cannot be reliably exported by FModel. This usually happens in case some third-party level
building system was used by the game’s developers. You can check the rough result of the state of the map to be
exported using the FModel’s builtin 3D viewer.